When my father asked my mom's dad if he could marry her, my grandfather had a few questions for my dad. You see, my grandfather knew that my dad wasn't going to pursue riches or any sort of fancy lifestyle, and he knew that wasn't something my mom was looking for either in life. He knew my mom wasn't a gourmet chef (after all, she was only 16 at the time!), but she also knew how to make cheap, simple meals in order to make ends meet. Most of all, my grandfather wanted to make sure my dad would take happy, willing and able to care of my mom for the rest of her life.
He asked my dad "Will you be okay with just eating beans and cornbread every day?"
My dad responded with "Absolutely! I LOVE beans and cornbread!"
Yeah, I don't think he quite understood my grandpa's point... haha! Grandpa was aware my mom knew how to make beans and cornbread, and he knew my parents' budget was going to be pretty tight and meals weren't going to be very extravagant. My dad didn't really care. He was raised by a single mom in Texas for many years, so beans and cornbread were A-Okay by him! Living on a meager budget was not going to be a big problem for him, and it wasn't going to be a problem for my mother either.
My dad was born and raised in Texas. My mother was born and raised in Texas. My brother and I were also born and raised in Texas. Where we grew up, beans and cornbread were a staple food! You could go to H-E-B and buy bulk pinto beans for drastically cheap prices, and guess what? You just bought an excellent source of a cheap protein that could feed your family for days. Beans are incredibly cheap, and they can be delicious! Nowadays, my dad can make a pretty fantastic pot of beans. It's one of his specialty dishes!
I was never a very big fan of refried beans, but if you put some borracho beans in front of me - oh, it was ON! I grew up on beans and cornbread, especially during the winter months. Since my father was in the construction business, the winter season was usually less prosperous because people were saving up money for the holidays and then recovering from the holiday spending. People weren't able to spend the money on getting the house fixed after taking a big financial hit at Christmas! Throughout the year, my mom would buy staple foods that wouldn't spoil so that we could be sure to have plenty to eat during the months when income was a lot lower.
These old, ingrained habits are largely why my pantry is so full all of the time! At any given point, you can almost always find things like beans in my pantry! But please, don't show up at my house if a zombie apocalypse happens :P (In other words, I am not worried about anyone showing up at my doorstep looking to ransack my pantry!) When I set out to make these Texas style borracho beans (translation: "drunk beans") the other day, all I had to buy was an onion, cilantro, canned tomatoes, a lime, and a garlic clove (I had one, but I wanted a fresher one). I spent about $5 at the grocery store to make this meal, and it made a very large family serving! I had the rest of the stuff sitting in the pantry (or fridge - bacon, bell pepper and jalapenos). I always use the dried chicken granules to make my own chicken stock, and I always use whatever bottle of beer is leftover from previously hosted gatherings. It is a delicious and cheap way to feed large parties of people!
Also, please note you can use a crock pot to make these beans, though I recommend using an enameled Dutch oven. I do recommend doing steps 1-2 in some sort of enameled Dutch oven or other large pan on the stove (for at least 30 minutes) before you put it in a crock pot. It will save you a lot of time, and you really should soak the beans for at least 4 hours. If you have a large amount of time, you can put all of the ingredients together in a large capacity crock pot and just leave it overnight or in the morning before you go to work.
As I discussed in a previous post, if you are concerned about the alcohol in the beans, please look at this link. Since you will be simmering the beans for over 2.5 hours, there will be less than 5% of that one bottle of beer left in your beans. 5% of the 5% of alcohol by volume in an average beer leaves you with about half of the alcohol in an Alcoholics Anonymous-approved "Near Beer"! When you divide that out into how many servings this dish makes, the amount of alcohol is almost negligible.
Larena's Borracho Beans
1 lb dried pinto beans, washed (and “sorted” to ensure there
are no rocks mixed in)
Water (no salt) to soak the beans
2 quarts chicken stock
1 ½ tbsp of Salt Grass Spice (if you don’t have it, use
salt/pepper to your taste, and add about ¼ tsp paprika)
2 cans Mexican style stewed tomatoes, cut into ½” pieces
1 white onion, diced
6 cloves garlic, minced
3-4 bay leaves
¼ cup pickled jalapeno slices, cut into half-slices
1 ½ cup (approximately) of chopped fresh cilantro, including
stems
1 – 12 oz bottle/can of a dark beer (or a Mexican beer such
as Dos Equis, Corona, Negro Modelo, etc)
3 slices of bacon, cut into ½” wide slices (or salt pork, bits of ham from ham hocks or sliced deli meat, etc)
½ of a bell pepper, diced into ½” pieces
1 tsp mesquite flavored liquid smoke
1 ½ tbsp dried oregano
2 tsp dried basil
1 tsp cumin powder
¼ tsp cayenne
½ tsp garlic powder
2-3 tbsp of tomato paste (to taste)
a small squeeze of lime juice
Additional salt/pepper to taste
Soak the beans (covered)
overnight, or for at least 4 hours.
Drain the beans, and
refill the pot with enough chicken stock to cover the beans with approximately 2 inches of
chicken stock (you may need to make additional stock, depending on the size of
your pan). Season with the Salt Grass spice (or salt/pepper/paprika
if you don’t have any of the 7-spice). Cover and bring the beans to
a boil. Once it has started to boil, reduce the heat to medium low,
re-cover, and cook for 1.5 hours. Stir your beans occasionally to
prevent the beans from sticking to the bottom of the pot.
Once the beans have
finished their main cooking process, add in all of the remaining
ingredients and stir well to combine and distribute the ingredients.
Continue to cook the
beans, uncovered, for 1 hour, or until the beans are nice and tender.
Taste the beans and add
some additional salt or pepper if necessary (I add approximately 1 more tsp of
pepper if I am using the Salt Grass steak spice).
Optional step: you can
crush the beans just a little bit with a potato masher or a meat tenderizer to
thicken the liquid. I prefer to just cook out some of the additional
liquid instead! The beans will be quite forgiving if you keep
stirring and cooking them, uncovered, at a low setting. Just keep an eye on them and don't let them sit for more than another hour or so.
For a nutritional value breakdown of this recipe, you can find it on My Fitness Pal by doing a search for "Larena's Borracho Beans." Disclaimer: this nutritional value calculation is just an estimation. http://www.myfitnesspal.com/recipe/view/41575906
When I try new foods, I'm often surprised at how fantastic they are. Gigante beans are definitely one of those foods! The first time I tried them, they were cooked Greek style. I was thoroughly impressed!
A few months ago, one of my friends asked me if I was familiar with them and if I knew where to find some in bulk. I was familiar with them, but I had no idea where to find them. After at quick Google search, I figured out I could find them here in Seattle at Big John's PFI near the International District. If you are a foodie in the Seattle area, you simply must go visit this store!
Low and behold, there they were - $4.99/lb for gigante beans. Score! The cheapest I could find them online was for $5.99 per pound plus shipping fees through Amazon . Alternatively, I just purchased several pounds of them from Big John's and went home. Now what?
After doing some searching for similar recipes to the one I had previously eaten, I pieced this recipe together. I have to say it was superb! It is definitely being added to our "cycle" of foods we make every so often. Though it does take a bit of time, it can be broken up easily by soaking overnight, cooking them in the pressure cooker the next evening, and baking them the next day. Or it can all be done one weekend afternoon.
This recipe can be easily doubled. It yielded about 6 servings. Alternatively, you could probably easily double all of the other ingredients in the recipe (except for gigante beans) and it would still be quite tasty.
1 lb dried gigante beans (soaked overnight, or at least 4
hours)
Water to soak the beans
Water to cook the beans in a pressure cooker
½ large onion, chopped (about 1 1/2 cups)
½ orange bell pepper, chopped into 1/2 inch pieces
½ red bell pepper, chopped into 1/2 inch pieces
1 – 14 ounce can diced tomatoes, preferably Italian
seasoning
3 garlic cloves, minced
1 large carrot, sliced
into 1/2 inch discs, big disc pieces cut in half or quarters
1 stalk celery & leaves, chopped into 1/2 inch pieces
1 chicken bouillon cube, crumbled
1 tablespoon ketchup
1/3 cup coconut oil (or olive oil)
1/3 lb bacon, chopped (or 6 oz. bacon and 6 oz good quality
pork sausage, cut up) (optional)
Ground pepper, to taste
Hot water to cook the beans in the baking dish
1 tablespoon fresh dill, minced
¼ cup (approx.) of crumbled Feta cheese
Directions:
Cook the pre-soaked beans in a
pressure cooker, with enough water to cover by one inch, for 20 minutes. Depending on the style of pressure cooker you
have, only count the 20 minutes once the pressure cooker has begun to whistle
at regular intervals (for mine, this is about 3x a minute using a 5 lb weight). Once the 20 minutes are up, turn the heat off
the beans and leave them in the pressure cooker, undisturbed, for 2-3 hours
before proceeding with recipe. (Note: if you do not have a pressure cooker,
cook the beans with 3 cups of water for every 1 cup of beans in a heavy
saucepan with a lid. Bring to a boil, reduce
to a simmer and then cook them for 45 minutes to an 1 hr 30 minutes, depending on how fresh your beans are. You might have to add cooking liquid if cooking for a long period of time. I would suggest letting them sit in the water, covered, for at least 1 more hour after they are done cooking.)
Preheat the oven to 400 degrees
farenheit.
Strain the beans and pour them into
a large glass baking pan. Note: it is okay if the beans are still a
little firm at this point, but they should be plumped up quite nicely.
Combine all of the remaining
ingredients, except the dill, and mix well.
Pour in enough hot water to cover
beans by 1" in the baking dish. Note: If the baking dish is not deep enough
to cover the beans, pour enough water until it reaches 1“ from the top. You only want to cover the beans 1” above where
they originally came to in the pan before you added the other ingredients.
Place the baking dish in oven and
bake for 1 hour 45 minutes. If you
prefer to have your beans more tender, check the beans for the consistency
after the 1 hour 45 minutes time is up. If
you want them to have a more tender texture, cook them for an additional 30 minutes.
Stir the dill in, and bake for an
additional 15 minutes.
Remove the baking dish from the
oven, and serve in bowls.
Top with a few crumbles of Feta
cheese in each bowl, and enjoy!
For the nutritional values of this recipe, you can log it through the My Fitness Pal application. Just search for "Larena's Gigante Beans." Disclaimer: this nutritional value calculation is just an estimation, and it is based off 6 servings. http://www.myfitnesspal.com/recipe/view/44023960
It is officially the fall season, folks! You know what that means. Pumpkin galore!
When I was a kid, I wasn't very big on pumpkin. There were plenty of opportunities for pumpkin pie, but I could never tolerate much of it without whipped cream. I am of the belief that is sacrilege to serve pumpkin pie without whipped cream. You've been warned!
We had the pleasure of meeting Bradley Ogden at his namesake Las Vegas restaurant before it closed. We decided to have a nice dinner at his restaurant on our last day in Vegas, and we were drawn in by his cookbook. No, we are still not ready to admit we have a cookbook addiction. When we ordered the book through our waiter, we asked if Bradley was available to sign it. It just so happened that he was in the kitchen that day, and he graciously agreed to sign our book! He was a very nice man, and we thoroughly enjoyed our wonderful dinner.
Triple Layer Pumpkin Pie
Imagine my delight when I was thumbing through our newly purchased Holiday Dinners with Bradley Ogden cookbook, and I found a recipe for a triple layer pumpkin pie. At that very moment, I knew it was ON!
I prefer not to serve any dishes to my guests if I haven't made the dish before. Since we are hosting a big dinner next month, I knew it would be important to try this recipe out before the big dinner. I am very glad I did. This is a masterful recipe, and I feel that there were some very important steps and tips left out of the recipe. Also, I tweaked it here and there.
If you're up for a challenge and want to see just how much of your hair you can pull out in one day, by all means, check out the unaltered recipe at this link. Knock yourself out!
If you'd rather have someone vet the recipe and give you tips on making it absolutely perfect, keep on reading. If you haven't gathered by now, I am very detail oriented. I frequently add my own variations to the recipes I find. I try to explain why each step is very important, and I try to let you know what will happen if you don't follow the instructions.
I know some people might find this more annoying than helpful, but I hope the majority of my readers find the details to be helpful! I would also really appreciate it if people would share this recipe, and post in the comments when you have tried it out! If you run across any recipes that make you want to pull your hair out, send them to me. I might see if I can figure out how to "fix" them for you.
There is a discrepancy in the cookbook that is sort of not listed on the above website. In the book, it lists 1 teaspoon of the pumpkin spice in the custard layer ingredients list, but in the instructions it says to add 2 teaspoons. If you look closely enough, you will notice the pumpkin spice ingredients create 4 teaspoons of the spice blend. If you go off the instructions in the website above, you would only use 3 of the teaspoons. It doesn't tell you what to do with the extra teaspoon. Tsk on the editors who missed that! It kind of drives me batty when recipes are not properly tested and written out.
Before you decide to take on this daunting task of a pie, there are some important things to note:
You will need to set aside a lot of time to make this pie. I'm talking all day long! If you follow my instructions and stay on top of things fairly quickly, you can make this pie in about 7 1/2 hours. Fortunately it's not 7 1/2 hours of "active" time. Even so, your pie will not be ready to eat in 7 1/2 hours since it needs to chill before serving! It requires a lot of waiting time for things to get to the right temperature. If you get the crust dough ready in advance, you can shave off about 1 1/2 - 2 hours off that big chunk of time. The recipe below is for a double pie crust, so at least you will have a back up if something goes wrong with the first crust! You can also make the pumpkin spice mixture ahead of time. I also highly recommend reading this entire recipe before getting started. It will help you prepare if you are able to imagine the process ahead of time.
You will need a large food processor for this recipe. Since the butter
will be frozen, it will need something strong to help cut and break it
down. I also suggest cutting the butter into the 1/4 pieces well in
advance. You can put separate the pieces and place them on some wax
paper on a cookie sheet, cover them, and freeze them. I suggest giving
them at least 45 minutes to freeze. It will make it easier to break
them apart and sprinkle them into the food processor. If you work too much to break them apart, it will warm them up.
If you do not have a KitchenAid stand mixer, be very careful with the speed settings on your hand mixer. You will be whisking a lot of ingredients together for this recipe. At the very minimum, you will need an electric hand mixer. If you're feeling up for torturing yourself, by all means, whisk by hand! Just remember that the medium setting speed on a hand mixer is much faster than medium speed on a KitchenAid stand mixer. With the hand mixers, you have to watch the blade speed vs going by the marked speed settings. If you have both a KitchenAid stand mixer and a hand mixer, I still recommend using only the Kitchenaid stand mixer just to make life a little simpler. For this recipe, I have noted in my instructions when you should clean up your bowl and whisk for the stand mixer. I also highly recommend using a spatula to scrape the bottom of the bowl. I included an Amazon link below for the best shape spatula for scraping the bottom of the KitchenAid bowls. Yes, it does make quite a difference. Every KitchenAid stand mixer owner should have one!
You will need a very deep dish glass or ceramic pie pan for this recipe. The recipe suggested using a 9-inch pie dish. This pie will overflow even if you use a 9.5 inch pie dish! If that is the only size you have, then you will need to set aside some of the pumpkin chiffon. I am trying to find one that has a wavy edge. I think a wavy edge will help give it a little extra room for the filling. I think I need to see them in person before making a selection. Once I find one, I'll come back and add it to the Amazon link below!
Plunger measuring cup
In order to make your life easier, I strongly recommend getting some of the pie crust bags. The 14" would be good, though the 11" one will work out as well. They cost less than $10 on Amazon (link is below), and they are wonderful! Even though you are using a 10" pie plate, using the 14" pie bag would be good so you can trim off some of the crust. If you only have the 11" pie bag, then you can take out a nice golf ball size chunk out of the crust before rolling it out. Since most people don't have pie crust bags, Bradley Ogden's recipe doesn't call for the pie bags. So this recipe does create a bit of extra crust. If you don't take some of the crust out before using the 11" pie bag, it will end up a little too thick.
I also recommend getting a squeegee measuring cup (pictured on the right, and link is in the Amazon list below). These are really good for thick liquid measurements such as creams, honey, condiments, balsamic vinegars, syrups, thick oils, etc. Basically you move the plunger to the required measuring line, and you pour your ingredient into the cup. There are two sets of lines and measurements marked on the cups. One is for "liquid fill" and the other is for filling to the rim. With the latter, you can level the measurements from the top of the container. They come in different sizes. I have a small one for measurements up to 2 tablespoons, and it comes in very handy. I genuinely love these tools!
You will need an instant read probe thermometer. Any type will do. You absolutely should have at least one in your kitchen!
Make lots of room in your fridge! You will have two medium size bowls in your fridge at least for 20 minutes, and this pie does need to be chilled.
On the brandy, unless it is an absolutely hard and fast "no no" for your personal beliefs, do not skip this ingredient. It does make a huge amount of difference in terms of flavor. If you are worried about alcohol content goes, there isn't a whole lot that will be left in the finished product. For more details on alcohol content after cooking, visit this link. First of all, the brandy portion of this recipe is baked for 30 minutes, so approximately only 35% of the alcohol will remain. Mind you, that is 35% of the approximately 35-60% alcohol contained in 1 tablespoon of brandy - for the entire pie. To start off, 1 tablespoon isn't even a shot, and it's not a lot of alcohol! After it's all cooked, there would be 2.1 milliliters (approximately .42 of a teaspoon) of alcohol left in the pie, divided over 8-10 slices! There is more alcohol in a single can of O'Doul's non-alcoholic beer than there would be in this entire pie! Even the biggest lightweight on the planet isn't going to get any alcohol effects from this recipe! The first time I made this recipe, I only had cognac on hand, and I didn't have access to my car at the moment. So instead of using regular brandy, I used 1 tablespoon of Remy Martin XO Cognac. Hey, it was all I had in the liquor cabinet! That was a very expensive pie, but it was a fine tasting pie! Since the Remy is a very strong cognac, the cognac flavor sort of overpowered the pie. In my most recent attempt, I used a mid-range price bottle of brandy - E&J XO Extra Smooth limited release brandy. This brandy in particular has 40% alcohol by volume, as did the Remy Martin XO Cognac. For those of you who are wondering "So which should I use? Brandy or Cognac?" The only real difference between cognac and brandy is the region they are crafted. All cognacs are brandies. Much like champagne is only called champagne if it is crafted in the Champagne region of France, true cognacs are crafted in the Cognac region of France. There, you even had an alcohol lesson today!
I substituted turbinado sugar instead of granulated sugar in the pumpkin custard layer. It is in fact true that turbinado sugar is better for us. I won't go into a diatribe about this, but I do suggest doing your own research about all of the ingredients and processes it takes to make granulated sugar. My friends who know me well enough know that I am not one of those
who gets blindly caught up in the "food should be healthy and organic"
mindset. Even with that in mind, I strongly suggest not substituting turbinado sugar for the egg whites and whipped cream portion of this recipe. Turbinado sugar doesn't break down like granulated sugar does in cold ingredients such as heavy cream and egg whites. You don't want a gritty chiffon or whipped cream. If you are taken back by the high cost of turbinado sugar (you should be!), I suggest purchasing a large 6 lb bag of it at Costco. Just the other day, I saw it there for just over $7. It costs more than double that at the regular grocery stores! If you don't have a Costco membership, you can purchase it for approximately the same price with the super-save shipping program at Amazon (when it is on sale). If you really want to be cheap about it (Hi, mom!), you can pick up a couple of packets of it at your local coffee shop ;-) You only need 1 1/2 tablespoons of it anyway!
Triple Layer Pumpkin Pie
Grocery list:
3 cups all-purpose flour
3 sticks of unsalted butter
1 1/2 cup sour cream (remember, 8 fluid oz = 1 cup)
~2 tablespoons cinnamon-sugar (2 tablespoons sugar + 1/3 teaspoon of cinnamon, mix)
Allspice
Cinnamon
Ginger
Salt
Cloves
2 1/4 cup of heavy cream
6 large eggs
1 tablespoon brandy or cognac
2 cups of pureed pumpkin
1/3 & 3/4 cup of packed brown sugar
4 tablespoons of granulated sugar
1 1/2 tablespoon of turbinado (sugar in the raw) sugar - though this can be substituted for regular sugar
1 envelope (1 tablespoon) of unflavored granulated gelatin
Ingredient list:
Pie crust
3 cups all-purpose flower
1/4 teaspoon salt
2 tablespoon cinnamon sugar
12 ounces (3 sticks) unsalted butter, cut into 1/4 inch pieces and frozen
1 1/4 cups sour cream
Pumpkin Spice Mixture (yields 4 teaspoons, more info on pie dusting later)
3/4 teaspoon ground allspice
1 3/4 teaspoon ground cinnamon
3/4 teaspoon ground ginger
1/2 teaspoon salt
1/4 teaspoon ground cloves
Pumpkin Custard
3/4 cup heavy cream
2 large eggs, beaten
1 tablespoon brandy or cognac
2 teaspoons Pumpkin Spice Mixture (above)
1/2 cup canned unsweetened pumpkin puree
1/3 cup lightly packed brown sugar
1 1/2 teaspoons turbinado sugar (granulated sugar can be substituted)
Pumpkin Chiffon
1 envelope (1 tablespoon) unflavored granulated gelatin
1 1/2 cups canned unsweetened pumpkin puree
3/4 cup lightly packed brown sugar
4 large egg yolks
2 teaspoons Pumpkin Spice Mixture (above)
3 large egg whites
1 tablespoon granulated sugar
Whipped Cream
1 1/2 cups heavy cream
3 tablespoons granulated sugar
For the pie crust:
1. Pulse the flour, salt, and cinnamon sugar together in the food processor until combined.
2. Scatter the pieces of frozen butter over the top of the flour mixture (see image to the left).
3. Pulse until the butter is the size of large peas, approximately 20 pulses (see image to the left). Remember, a "pulse" is about 1 second on, and 1 second off.
4. Add the sour cream and pulse until the dough forms one large ball.
5. Divide the dough into two pieces. If you want, you can use a kitchen scale to try to even the two sides out.
6. Put the two mounds of dough on top of sheets of plastic wrap (I recommend the Glad Press & Seal wrap), and flatten each into 4 inch wide disks.
7. Wrap up the dough disks, and refrigerate one of the doughs for 1 hour. (Tip: you can put the other one in the freezer for up to a month. The dough will keep in the refrigerator for up to two days. When using the frozen dough, let it thaw completely on the counter before rolling it out). This is the 1st part where you get to take a 1 hour break!
8. When you are ready to bake your crust, take it out of the fridge and set it on the counter for 10 minutes.
9. Preheat your oven to 350 degrees.
10. If using a pie crust bag:
Pie crust rolled out in the pie crust bag
If using the 11" pie bag, take out about a golf ball size amount of dough from the mound of dough. If using the 14" pie bag, skip this first step. I do recommend using the 14" pie bag instead.
Lightly flour the inside of the bag - top and bottom.
Put the dough inside the bag and zip it up.
Roll out the dough, and be sure to spread the dough all the way to the edges of the bag (see image to the right).
Unzip the bag, and carefully loosen the edges of the dough from the bag, and peel off one side of the pie bag from the dough.
Place your pie pan centered and upside down on the rolled out dough.
Flip the pie pan and dough over.
Remove the pie crust bag from the dough.
Spread out the pie crust in the pie pan, and make sure the dough is evenly placed around the edges of the pan.
Using your fingers or the back of a spoon, spread out the dough where it is about 1/2 an inch larger than the edge of the plate.
11. If not using a pie crust bag:
Lay the prepared dough on a lightly floured work surface.
Roll out the dough outward from the center into a 12-inch circle, about 1/8 inch thick.
Loosely fold the dough into quarters, and gently transfer it to the 10 inch pie plate.
Unfold the crust and gently press it into the pie plate, letting the excess hang over the pie plate.
Using a sharp instrument, trim off the excess dough to about 1/2 inch larger than the edge of the plate.
12. Tuck the excess 1/2 inch of dough underneath itself to form a neat, even edge that sits on top of the pie plate.
13. Press a decorative trim into the edge of the pie. You can use a fork to make some impressions, or you can use the back of a butter knife to make a rope-like impression.
Pie beads in the pie, ready to be baked.
14. Line the pie shell with a double layer of aluminum foil and fill with pie weights, old (uncooked) beans, or (washed) pennies (see image to the right). You will find a link for pie beads in the Amazon list below.
15. Bake the pie crust for 15 minutes. Hint: you will want to get started on the custard right after you put the pie in the oven.
16. Once the 15 minutes are up, remove the crust from the oven and remove the weights and foil. Since the pie beads will be hot, be sure to pour them into a temperature safe bowl or colander so they can cool off.
17. Continue to bake the crust until light golden brown and crisp, approximately 5 minutes longer. Fair warning: the crust will likely bubble up in the last 5 minutes of baking time. You can use a fork to stab some steam holes into the crust before or after it is done baking, and be careful to encourage it to settle down to an even layer. Don't put your hand right over the steam holes! For the most part, it will settle down fairly nicely on its own - after the steam holes have been vented.
18. Place the pie plate on a cooling rack while assembling the custard. Keep the oven on.
Before mixing the spices
For the pumpkin spice mixture: (you can also do this step in advance)
1. In a small bowl or ramekin, combine all of the ingredients for the spice mixture.
2. Set aside.
After mixing the spices
For the pumpkin custard:
1. While the pie shell is baking, put the eggs into your mixing bowl and lightly beat them with a fork (if you haven't beaten them yet).
2. Add the cream, brandy, and 2 teaspoons of the spice mixture to the eggs.
3. Whisk until combined.
4. Using a spatula, scrape the sides and bottom of the bowl to ensure all of the ingredients are incorporated (pictured on the left).
5. Add the pumpkin, brown sugar, and turbinado sugar to the mixture.
6. Whisk until combined.
7. Using a spatula, scrape the sides and bottom of the bowl to ensure all of the ingredients are incorporated (pictured on the right). Notice it is a little darker and more "pumpkin" colored now.
8. Using the spatula to stir while scraping the bowl, pour the pumpkin custard into the warm pre-baked crust (pictured to the left).
9. Bake until the edges of the pie are set, and the center of the pie registers at 175°F on an instant read-thermometer. This should take about 30 minutes. If you do not like dark golden crusts (I don't!), you can use a pie shield (pictured to the right, listed in the Amazon link below). Hint: While the pie is baking, this is the 1st part where you will want to wash your mixing bowl and whisk. You don't want that pumpkin custard mixture to get caked on.
10. Remove the pie from the oven, and set it on a cooling rack to cool it to room temperature. This should take approximately 1 hours (pictured to the right). It will be a bit darker than before, and it will largely resemble the pumpkin pies you are familiar with. This is the part where you can take a break!
11. Refrigerate while you are preparing the chiffon layer.
For the pumpkin chiffon layer:
1. In a small sauce pan, combine the gelatin and 1/4 cup cold water.
2. Let it soak (without heat) for 5 minutes.
3. While the gelatin is soaking, put a separate medium sauce pan over medium-low heat, and whisk together the pumpkin puree, brown sugar, egg yolks, and 2 teaspoons of the pumpkin spice mixture.
4. While stirring constantly, bring it to a simmer.
5. Once it has started to simmer, remove it from the heat, and transfer to a medium sized mixing bowl. You are going to be adding 3 whipped egg whites to it, so make sure you use a large enough bowl for this task.
6. Place the gelatin sauce pan over low heat until the gelatin is completely melted. After about half a minute or so, you can stir it gently to encourage the gelatin to melt. This will take approximately 1-2 minutes.
7. Remove the gelatin from the heat.
8. Add the gelatin to the chiffon mixture, and stir until thoroughly combined.
9. Cover the bowl and place it in the refrigerator until the mixture is just slightly set, and the center jiggles just slightly when shaken. This will take 15-20 minutes. You do not want to let it sit too long, otherwise it will become too firm. It will be relatively forgiving in this regard. You just don't want to let it sit in the fridge for hours on end.
Note: You are going to come back to complete the chiffon layer. For now, there are a few more steps that need to be done quickly while the chiffon layer is firming up.
For the whipped cream layer:
1. Pour the whipped cream into your mixing bowl, and whisk it on medium speed until small (not medium or large) bubbles form. This will take approximately 30 seconds.
2. Increase the speed to medium-high speed, and sprinkle in the granulated sugar. Continue to whip until the cream thickens and forms stiff peaks. This will take approximately 2 minutes.
3. Set aside 1/4 cup of the whipped cream, cover it, and refrigerate it.
4. Transfer the remaining whipped cream to a separate bowl, cover it, and refrigerate. Hint: you will need to quickly wash your mixing bowl and whisk again.
For the remaining portion of the chiffon layer: (see the section below titled "If you prefer to cook your egg white meringue")
10. Pour your egg whites into your mixing bowl, and whisk the egg whites at medium-low speed until frothy. This will take approximately 1-2 minutes.
11. While the mixer is running, sprinkle in the granulated sugar, and increase the speed to medium-high. Keep whisking until stiff peaks form. This will take approximately 1-2 more minutes.
chiffon layer, before egg whites and whipped cream are added
12. Hopefully your chiffon will be done gelling up by this time (see image on the right). Remove the chiffon layer and the baked pumpkin pie from the refrigerator.
**12. Using the whisk, stir about 1/4 of the whipped egg whites into the chiffon mixture to lighten it.
13. Using a rubber spatula, gently fold in the remaining egg whites and reserved 1/4 cup of whipped cream until no white streaks remain.
After the chiffon layer has been added to the pie
14. Spread the chiffon mixture onto the prepared pumpkin pie, mounding it slightly in the middle. Depending on the size of your pie pan, you may have some overflow. Considering there is one more layer to this pie, you might need to set some of the chiffon mixture aside (see image to the left). Another option is to chill the pie very well before you add the whipped cream layer. I highly recommend doing this since it helps "set" the layer in order to prevent it from overflowing when you add the whipped cream on top.
15. Gently spread the whipped cream attractively over the top of the pie.
16. You can either lightly dust the pie with some cinnamon or you can create another 1/2 batch of the pumpkin spice mixture. Since it is going on top of whipped cream, you can probably skip the salt.
17. Cover with a dome cover or cake cover, and refrigerate for a few hours before serving. You can serve it immediately, but the chiffon layer will run all over the place. It is much more attractive if you serve it cold. It must be refrigerated at all times since it has uncooked egg whites in the chiffon layer. This brings me to the final hint.
If you prefer to cook your egg white meringue:
1. Place a thick glass, medium size bowl over a sauce pan of barely simmering water, and add the egg whites and sugar. (See Further explanation below*)
2. Lightly whisk until the egg whites register 140°F on an instant-read thermometer or they are hot to the touch.
3. Pour the hot egg white into your room temperature mixing bowl.
4. Whisk on medium-high speed until doubled in volume and stiff peaks form. This will take approximately 1-2 minutes.
5. Add to the chiffon layer per the instructions above.**
*Further explanation:
This process creates a double boiler, and it is used for putting indirect
heat on ingredients that need to be cooked with a hot steam. It helps
ensure the ingredients will not scorch or burn. Since you want the
steam to heat the bowl, do not let the water touch the bottom of the
glass bowl. You will want to use a glass bowl that can fit inside the pan and form a seal over the top of the pan. Holding the bowl over the heat would be a very bad idea! Using a metal bowl would require a lot more stirring since metal doesn't conduct heat as evenly as glass does.
------
I hope you enjoy the recipe! I promise you, it is an absolutely divine pie! It really is worth all the effort.
That's right, today is National Cheesecake Day. In honor of this very important holiday, I decided to make a cheesecake yesterday.
"Wait, you made a cheesecake the day before National Cheesecake Day?"
Why yes, that's right. I made it the day before the day of celebration. After all, it takes about 8-10 hours to make my cheesecake! I typically use blackberries in my cheesecake, though it's much better with marionberries. I've made it with raspberries too, but it wasn't nearly as good. I made one without any berries for a friend of mine who is allergic to all berries (so sad!). He wrapped and froze that thing, and he ate it over the course of a month. He even hid it in his freezer when his family stopped by to visit. He didn't share one bite! Haha! His name is remaining anonymous for fear of retaliation by his family members. The cheesecake does magically taste better when it's frozen. The wonderful berry flavor permeates!
"Will you give us your cheesecake recipe?"
Ha! No. Even if I did, who amongst you would dedicate an entire day to making a cheesecake? Wait? No one? That's what I thought. I've given my recipe to a few friends who have asked, and I've never had anyone come back and say "I made it, and it was a hit!" ... because nobody's ever made it! Let the record show that my dedication to food is pure and strong!
Yesterday afternoon when I finished mixing the cheesecake batter, I called out to my dude so he could come downstairs to lick the mixing blade. I turned around, and he was already patiently and quietly waiting behind me like a cake batter ninja. Very, very sneaky, sir!
At one of my old jobs, I had brought in some cheesecake to share with the office. I offered some to our building maintenance guy since he was always helping us out with favors around the office.
After he took a bite, he said "Oh my god... that's a good cheesecake. Now ... why are you still single?" Haha! It always makes me feel good to turn cheesecake non-believers when they say "I like that cheesecake!" I certainly can relate. Don't even get me started on the Melting Pot's cheesecake. It's just so gross!
Alright, enough about my cheesecake. Since I'm not going to share my recipe, it's time to talk about how you can make your cheesecake perfect! First of all, no-bake cheesecakes don't count. Sure, they're fine in their own right, and they come in handy when you don't have a lot of time or energy to invest into a cheesecake. A true cheesecake is baked!
The two main elements to a good cheesecake are: temperature and a well-aerated batter.
First of all, you need to start off with all of your cold ingredients are at room temperature. That means the eggs, cream cheese, and anything else that would normally be in the fridge. "Cool" doesn't count; it has to be room temperature. Using a water bath is also a great way to ensure a proper temperature for your cheesecake. I bake mine in a water bath for about an hour and a half at 325 degrees. Then I turn the oven off, leave the door propped open, and I let it sit in the water bath inside the oven for an hour. After that, I put it on a rack and let it cool to room temperature for a few hours. Then it has to go into the fridge to chill for another 4 hours minimally. When you follow these steps, it helps ensure that your cheesecake won't crack or cave in. Cheesecake takes a lot of time to prepare! I usually set aside at least 8 hours for my cheesecake, and that doesn't include refrigeration time.
For a well-aerated batter, you have to make sure your cream cheese is nice and fluffy. You have to be careful to not over-fluff it! A good 4 minutes on medium speed is a good start. Then add your sugar, and whip at medium for another 4 minutes. When you add your eggs, whip at medium speed for a full minute after you add each egg. Of course this largely depends on the ingredients you are using for your cheesecake.
All in all, today's cheesecake was a hit! I wished I had a blow dryer to help get it out of the spring form pan for a smooth finish. Of course it tasted just the same. I'm just glad I came home with a leftover slice!
I recently sent a very dear friend the most glorious gift anyone could possibly send: the gift ... of pork. *cue the angels standing below the Salumi's flag, singing an aria chorus as they look up into the heavens*
Of course this friend doesn't truly know how glorious this gift is just yet. You see, I sent this salami chub to a friend in Texas. She has only tried salami from the local grocery store chain called H-E-B in Texas. Obviously this had to be remedied! Don't get me wrong, I still love H-E-B (and miss that place immensely!). They're just not known for their quality salami. Now that I think about it, I'm not sure if I did her a true "favor" since she will be forever spoiled!
So she received her chub of Salumi's DaVino salami in the mail yesterday, and she sent me a message saying "It smells wonderful. Now what to do with it?!?"
We-heh-heh-hell then. First of all, the best thing to do with a perfect artisan salami chub is to cut it with a meat slicer. If you don't have one, call around to your local deli or butcher and ask if they will cut it for you. Some places will charge a nominal fee - $.50 or so - to slice meat. You want to slice it very thin - thin enough where you can sort of see through it and you won't have to really bite down your teeth to cut through it. You don't want it sliced so thinly that your slicer isn't able to capture a fully-round circle with it. My slicer will do that with the lowest setting sometimes. That's right, folks, I have a meat slicer in my kitchen. I'm not even sorry. I included a link for it in my widget below in case anyone is interested.
You can create a sandwich just like Salumi's would! You can use sticcole or giuseppe bread (think: ciabatta bread). Add some olive oil with some finely minced garlic as a base to the bread, add some olive tapenade, provolone cheese, lots of salami (maybe about 2 layers of very thinly sliced salami), some grilled onions and Italian peppers (pepperoncini's if you like them).
I would also strongly recommend putting the salami on a pizza. My personal favorite combination is pepperoni, white onions, and some Italian sausage on it. Need specifics?
Fine, you twisted my arm. I am hereby giving you my pizza crust recipe. That's right, my very own first recipe that I am sharing on this blog. I am making blog history today! Of course I reserve the right to perfect it and not tell you how I've tweaked it. You get what you pay for, folks! :)
Larena's deep dish pizza dough
1 1/2 cups of warm water (105-115 degrees)
1 package of active dry yeast, or 2 1/4 teaspoons if you use yeast from the jar
2 Tbsp olive oil
2 teaspoons of Kosher salt
1 teaspoon of sugar
3 1/2 cups of bread flour
extra olive oil for the baking pan
In a large bowl (preferably a KitchenAid stand mixer bowl), add your warm water, and sprinkle the yeast onto the surface of the water. Let it sit for 5 minutes until the yeast is bloomed and dissolved. Basically you want to see lots of bubbles that moved around, and you shouldn't see granules of yeast anymore. If the yeast is not dissolved at the end of the 5 minutes, stir it completely to finish dissolving. Tip: If you have a clear glass KitchenAid bowl, it will be easier to see when it is fully dissolved. Also, make sure your yeast is not expired! If you use regular flour instead of bread flour, your crust will be just a little more tough.
In a separate bowl, mix the flour, salt, and sugar and whisk the ingredients together.
Next, add your regular mixing paddle to the mixer. Add in the dry ingredients and the olive oil to the bowl, and mix at a low speed for 1 minute.
Remove your mixing paddle and replace it with the dough hook. If you do not have a stand mixer or a dough hook attachment, then you will need to start kneading old school style! Knead using the dough hook on low to medium speed until the dough is smooth and elastic. This will take about 10 minutes with the stand mixer. If the dough still seems too wet, sprinkle it with a little more flour.
Lightly coat the inside of a large glass or metal bowl with olive oil. Toss the dough into the bowl, and turn the dough until it is nicely coated with oil. Loosely cover the bowl with plastic wrap, and set it in a warm place until it has doubled in size. I recommend either putting it in a (clean) dishwasher near the heating element after it had finished a cycle (don't turn the dishwasher on while the bread is in there!), or you can heat your oven to 150-175 degrees, turn off the oven, and place the bowl into the warm oven.
Using a deep metal baking dish, coat the bottom of the pan with a bit of olive oil. Tip: You do not want to use a glass baking dish because it will make the dough soggy. A metal baking dish will ensure a crisp crust bottom. Take the dough out of the bowl, and spread it around the bottom of the metal baking dish - to the edges - until it largely resembles the shape of your dish. Press the dough all along the bottom of the baking dish to prevent bubbles.
For the actual pizza, preheat your oven to 450 degrees. Coat with your favorite pizza sauce (according to your taste), lightly sprinkle some Italian herbs or Herbs de Provence, spread about 2-4 cups (according to your taste) of mozzarella cheese, and add the Salumi's salami, white onions, pepperoni, and (cooked and cooled) Italian sausage. Bake for 30 minutes, or until the cheese is fully melted and has a few golden spots. The crust should be a nice light golden color.
Enjoy!
Today, a friend asked me for cookware recommendations. I cannot recommend Viking and All-Clad enough! Their stainless steel pans are awesome. I am including a link below in my widget. Don't bother spending the extra money for the copper core pans. Maybe one day I will post a blog about what each pan is purposed for!
A good, long-time friend of mine recently got married. While trying to pick out a wedding gift for her, I found out she was hoping to receive the donut maker she had on her registry. I mentioned this to my dude, and he said "Forget donuts. You should get her an ebelskiver maker!"
"What the heck is an ebelskiver?" I asked.
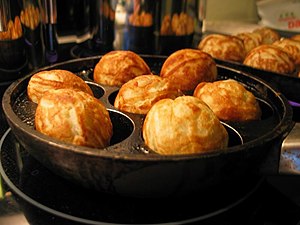
He pulled up a Google search, and explained that it was a Danish puffed pancake, usually filled with fruits, jams, or any other sweet or savory ingredients. How the heck did I never know about these things before?! They are also known as aebelskivers, evelskivers, Æbleskivers, ebleskivers, etc. The pan has special hemispherical indentations. The pan exists in versions for gas and electrical stoves (the latter with a plain bottom). Pans are usually made of cast iron to allow good heat conduction, though they also come in non-stick coating.
I usually like to stick to people's gift registries in order to ensure I give them a gift I know they will enjoy. Once I found out about ebelskivers, all bets were off. I told my friend "I'm going off-registry. You're just going to have to trust me on this one." She said she trusted my taste, so I went with it! As it would turn out, I did very well in selecting the ebelskiver maker! She has some Danish roots in her heritage, and her mother practically grabbed the cookbook out of her hands when she saw the gift! She went on to talk about how her grandmother would make ebelskivers in her cast-iron pan. She said she thought she had a copy of her grandmother's recipe somewhere (hint: I'd love to try it for myself *wink*). I just love it when I hit a home-run with my gifts!
I did some research, and decided I would go with an electric ebelskiver maker since a pan could possibly have issues with uneven cooking. I found one electric ebelskiver maker available at William Sonoma. There I was, standing in the store about a week before my friend's wedding. I had a very serious dilemma: do I get one ebelskiver maker for my friend, or do I get two (one for me, one for her)?
As you probably guessed, I'm weak. I bought two. Not sorry. Yes, I realize I have a serious problem with my kitchen gadget addiction. Though I must say I have discerning taste. I almost got suckered into buying the "ebelskiver turners" for $12.95 at William Sonoma as well. I read some reviews, and several people said chopsticks or bamboo skewers work just fine. They were right!
The next morning, I opted to test out my new toy. I couldn't very well give my friend her gift without being able to provide some sort of help in figuring out how to make them, right?!
I found a batter recipe online, and I decided to make some ebelskivers with blueberries. They were great! Then I decided to make a few with Nutella. They were awesome too. Oh, but then I decided to make some with Nutella *AND* blueberries! It felt like that scene from Ratatouille where Remy eats the strawberry and cheese separately; then .. oh then .. he combines the two and it's just glorious!
My first batch had a few failures. For one, I didn't cook them long enough. I quickly learned that they need to be a nice golden color all the way around, otherwise they will be raw and runny in the center.
I found that adding just about a quarter of a pad of butter - just a
very tiny amount - helps grease the pan. Even if you're using a
non-stick pan, it helps. It's probably vital if you're using a
cast-iron pan.
I also learned that you only need to fill the pan indentations to about a half-inch below the top. This will allow your fillings to fill in that extra space.
When using a semi-liquid ingredient such as jam or Nutella, it's best to put about a raspberry sized dollop on the top of the raw batter right away. You have to act fast before the batter starts to cook too much! Let it sink or use your skewers to cover it up with dough from the sides so the filling will be encased. If you're using fruit with Nutella/jam/etc, then put the fruit in immediately after the other filling so it can help push the filling further into the ebelskiver. For my ebelskivers, I use about 5 blueberries with the raspberry-sized dollop of Nutella. They taste fantastic with a little bit of maple syrup! I am eagerly awaiting trying out some new recipes from the cookbook I bought as well, and I included a link below. You can even make little egg puffs in the ebelskiver maker!
My one and *only* complaint is that the electric ebelskiver only has 9 slots. I sort of wish it had 12 since that would make it easy for dividing between 2, 3, and 4 people. Of course it's easily remediable by just making more! I do enjoy it being a stand alone product. This way I can take it into work if I ever want to make ebelskivers for my coworkers. I have noticed a few "hot spots" with the heating element. It just takes a little time to experiment with filling each slot in an order to ensure an even cook time.
The regular ebelskiver pans run anywhere from $20-30, though they typically only have 7 slots. I included links to some of the Amazon offerings in my widget below. You will notice there is a link for a 12-slot Takoyaki pan. They're basically the same concept in terms of how the pans are made. If you purchase a non-stick pan, make sure you only use wooden turning utensils such as bamboo skewers or chopsticks. You wouldn't want to scratch your ebelskiver pan. The non-stick pans are easy to clean up with a damp cloth, and I am a fan of that!
Of course there are a few other kitchen gadgets that make the ebelskiver-making process very easy. I absolutely LOVE my KitchenAid stand mixer! I don't know how I lived all of those years without one! It is hard to imagine life without it now! If you don't have one (I know, they are NOT cheap!), Black Friday and Cyber Monday are usually the best time to purchase these. Trust me when I say this: do not go off-brand and get a cheaper brand of stand mixer. You won't be able to use the same variety of attachments with them. KitchenAid makes a vastly superior array of products. Costco also usually has some good deals as well, though usually it's for the larger one with the bowl lift. I purchased it in the past, and I found it to be kind of a pain to get it locked into place. Hint: guys, this would make a great present for your wives!
I still use my old electric hand-mixer on occasion, especially for making ebelskivers. Why? Sometimes you need to whip up egg whites or whipped cream separately. It is a bit of a pain to have to clean KitchenAid attachments and bowls (if you have an extra bowl - something I intend to purchase one of these days) between batters - only to combine the two batters again later. So if any of you find yourself upgrading to a KitchenAid stand mixer, do not get rid of your old electric-hand mixer thinking you won't ever need it again!
I also recommend a gadget upgrade for every KitchenAid stand mixer owner. A couple of years ago, they started selling a paddle attachment with a rubber scraper built in on one side. It has the same base as the regular paddle attachment that comes with each KitchenAid stand mixer. It works really well at incorporating as much of the batter ingredients as possible. Depending on how full your bowl is and which speed setting you choose, you will notice a tiny line of ingredients along the top edge where the paddle stops. It's almost negligible compared to how much gets left behind with the old paddle attachment. It costs about an extra $20, but it is definitely worth the extra cost. I included a link to it in my widget below. I have seen larger ones available for the larger stand mixers, though I do not see them on Amazon at this point in time. This scraper paddle should be your very first attachment upgrade!
One last tip on KitchenAid mixers: the steel blades aren't really dishwasher safe. They will change colors and lose their sheen if you put them in your dishwasher. I've never had that issue with putting the enamel coated blades in the dishwasher - including the scraper paddle.
I have tons of other KitchenAid attachments, so stay tuned for more reviews on those!