"What the heck is an ebelskiver?" I asked.
I usually like to stick to people's gift registries in order to ensure I give them a gift I know they will enjoy. Once I found out about ebelskivers, all bets were off. I told my friend "I'm going off-registry. You're just going to have to trust me on this one." She said she trusted my taste, so I went with it! As it would turn out, I did very well in selecting the ebelskiver maker! She has some Danish roots in her heritage, and her mother practically grabbed the cookbook out of her hands when she saw the gift! She went on to talk about how her grandmother would make ebelskivers in her cast-iron pan. She said she thought she had a copy of her grandmother's recipe somewhere (hint: I'd love to try it for myself *wink*). I just love it when I hit a home-run with my gifts!
I did some research, and decided I would go with an electric ebelskiver maker since a pan could possibly have issues with uneven cooking. I found one electric ebelskiver maker available at William Sonoma. There I was, standing in the store about a week before my friend's wedding. I had a very serious dilemma: do I get one ebelskiver maker for my friend, or do I get two (one for me, one for her)?
As you probably guessed, I'm weak. I bought two. Not sorry. Yes, I realize I have a serious problem with my kitchen gadget addiction. Though I must say I have discerning taste. I almost got suckered into buying the "ebelskiver turners" for $12.95 at William Sonoma as well. I read some reviews, and several people said chopsticks or bamboo skewers work just fine. They were right!
The next morning, I opted to test out my new toy. I couldn't very well give my friend her gift without being able to provide some sort of help in figuring out how to make them, right?!
 I found a batter recipe online, and I decided to make some ebelskivers with blueberries. They were great! Then I decided to make a few with Nutella. They were awesome too. Oh, but then I decided to make some with Nutella *AND* blueberries! It felt like that scene from Ratatouille where Remy eats the strawberry and cheese separately; then .. oh then .. he combines the two and it's just glorious!
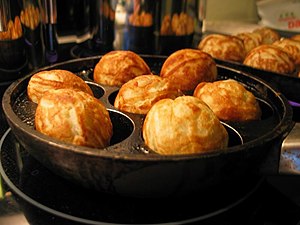
My first batch had a few failures. For one, I didn't cook them long enough. I quickly learned that they need to be a nice golden color all the way around, otherwise they will be raw and runny in the center.
I found that adding just about a quarter of a pad of butter - just a very tiny amount - helps grease the pan. Even if you're using a non-stick pan, it helps. It's probably vital if you're using a cast-iron pan.
I also learned that you only need to fill the pan indentations to about a half-inch below the top. This will allow your fillings to fill in that extra space.
When using a semi-liquid ingredient such as jam or Nutella, it's best to put about a raspberry sized dollop on the top of the raw batter right away. You have to act fast before the batter starts to cook too much! Let it sink or use your skewers to cover it up with dough from the sides so the filling will be encased. If you're using fruit with Nutella/jam/etc, then put the fruit in immediately after the other filling so it can help push the filling further into the ebelskiver. For my ebelskivers, I use about 5 blueberries with the raspberry-sized dollop of Nutella. They taste fantastic with a little bit of maple syrup! I am eagerly awaiting trying out some new recipes from the cookbook I bought as well, and I included a link below. You can even make little egg puffs in the ebelskiver maker!
My one and *only* complaint is that the electric ebelskiver only has 9 slots. I sort of wish it had 12 since that would make it easy for dividing between 2, 3, and 4 people. Of course it's easily remediable by just making more! I do enjoy it being a stand alone product. This way I can take it into work if I ever want to make ebelskivers for my coworkers. I have noticed a few "hot spots" with the heating element. It just takes a little time to experiment with filling each slot in an order to ensure an even cook time.
The regular ebelskiver pans run anywhere from $20-30, though they typically only have 7 slots. I included links to some of the Amazon offerings in my widget below. You will notice there is a link for a 12-slot Takoyaki pan. They're basically the same concept in terms of how the pans are made. If you purchase a non-stick pan, make sure you only use wooden turning utensils such as bamboo skewers or chopsticks. You wouldn't want to scratch your ebelskiver pan. The non-stick pans are easy to clean up with a damp cloth, and I am a fan of that!
Of course there are a few other kitchen gadgets that make the ebelskiver-making process very easy. I absolutely LOVE my KitchenAid stand mixer! I don't know how I lived all of those years without one! It is hard to imagine life without it now! If you don't have one (I know, they are NOT cheap!), Black Friday and Cyber Monday are usually the best time to purchase these. Trust me when I say this: do not go off-brand and get a cheaper brand of stand mixer. You won't be able to use the same variety of attachments with them. KitchenAid makes a vastly superior array of products. Costco also usually has some good deals as well, though usually it's for the larger one with the bowl lift. I purchased it in the past, and I found it to be kind of a pain to get it locked into place. Hint: guys, this would make a great present for your wives!
I still use my old electric hand-mixer on occasion, especially for making ebelskivers. Why? Sometimes you need to whip up egg whites or whipped cream separately. It is a bit of a pain to have to clean KitchenAid attachments and bowls (if you have an extra bowl - something I intend to purchase one of these days) between batters - only to combine the two batters again later. So if any of you find yourself upgrading to a KitchenAid stand mixer, do not get rid of your old electric-hand mixer thinking you won't ever need it again!
I also recommend a gadget upgrade for every KitchenAid stand mixer owner. A couple of years ago, they started selling a paddle attachment with a rubber scraper built in on one side. It has the same base as the regular paddle attachment that comes with each KitchenAid stand mixer. It works really well at incorporating as much of the batter ingredients as possible. Depending on how full your bowl is and which speed setting you choose, you will notice a tiny line of ingredients along the top edge where the paddle stops. It's almost negligible compared to how much gets left behind with the old paddle attachment. It costs about an extra $20, but it is definitely worth the extra cost. I included a link to it in my widget below. I have seen larger ones available for the larger stand mixers, though I do not see them on Amazon at this point in time. This scraper paddle should be your very first attachment upgrade!
One last tip on KitchenAid mixers: the steel blades aren't really dishwasher safe. They will change colors and lose their sheen if you put them in your dishwasher. I've never had that issue with putting the enamel coated blades in the dishwasher - including the scraper paddle.
I have tons of other KitchenAid attachments, so stay tuned for more reviews on those!
No comments:
Post a Comment